Today I have looked into 123D Catch which Drew mentioned during my progress review. - http://www.123dapp.com/catch - http://www.digitaltutors.com/lesson/25346 -
A note the tutor says is to try to use around 40 images as when it goes into the 70s it tends to cause problems.
I had previously found a 360 view of the statue which I think they must have used this or a similar technique.
According to my schedule I should be very well on my way with my modeling, having it complete in 2.5 weeks.
Thursday, 19 December 2013
Thursday, 5 December 2013
More work on the ground floor
I have pieced together a few of the arches to see what they are like and have added the lights to it. I need to smooth the archways and still extrude them to make them like the actual building. I did a 'smooth' test and they arent exactly rounded, there are a few odd shapes so I need to fix that as well.


I have done a 360 look around the building and saw that one of the faces was gone, I must have deleted it while deleting another, not to worry though as that was easily fixed by 'filling the hole'. Also I noticed on the end colum there were extra lines that managed to find there way all over. Double clicking on the line isnt selecting the whole line so I have to click every single line, twice, before they actually delete so might take a bit of time to make sure I have captured all of them!

I tried to render the scene instead of doing a screen shot and this wonderful thing happened. The image plane image seems to have taken it upon itself to be a texture, how lovely :)

Think that calls for a bit of a break then try sorting the arches out a bit more.

Wednesday, 4 December 2013
Top floor windows
For the top part of the building there are circle windows so I have been looking for a good tutorial that isnt using booleans.
I have managed to find one via creativecrash :
http://www.creativecrash.com/maya/tutorials/modeling/polygon/c/cutting-circular-holes-into-planar-meshes-while-maintaining-good-topology
The images I am also using to help get the detail for this are:


.jpg)
The tutorial shows the basic move in order to make the circle. To create the cuts I went into 'top' view and used the split tool. I then pressed 'enter' to set the lines in place.
I was on a roll with it until I pressed the wrong key, and now it wont go back to how it was so looks like I will be starting this over. I love how ever when following a tutorial things can still go squiffy.


I have managed to find one via creativecrash :
http://www.creativecrash.com/maya/tutorials/modeling/polygon/c/cutting-circular-holes-into-planar-meshes-while-maintaining-good-topology
The images I am also using to help get the detail for this are:


.jpg)
I was on a roll with it until I pressed the wrong key, and now it wont go back to how it was so looks like I will be starting this over. I love how ever when following a tutorial things can still go squiffy.


Well during my 5th attempt Maya closed! Might be a hint to move on to something else.
Monday, 2 December 2013
Modeling the columns
Starting on the columns and arches for the ground level of the building.
I think a second monitor might come in handy here :/

I have a youtube video open on tips with making door way arches and columns, a few of my reference photos and the maya file. All on one screen is a little too messy and squished. Glad Christmas is coming up, fingers crossed I get some money and I can invest in a second screen.
While modeling the columns its had made me aware how bad quality the images are that I have. I have done a google search searching for images larger than 8MB. This has helped ALOT, so much more detail in images. I actually wasnt aware that I could a search like this until my friend told me.
So the images that will be helping me with the columns are below:


Can never have enough references I say. Especially when they help with the final product! The top two images have been chosen as they help big time with the bottom of the columns. I have quite a few already for the tops so I should be okay to continue with this.
Before coming across the more detailed image, I had started the shape, but now will need to delete the top part of this as there needs to be more edges.


Well it has taken three hours to get this much done, doesn't seem like a lot in that amount of time but it has taken time to click back and forward between the different ref images, the youtube video, my own work and other google searches to query certain things through out the modeling.
I think a second monitor might come in handy here :/

I have a youtube video open on tips with making door way arches and columns, a few of my reference photos and the maya file. All on one screen is a little too messy and squished. Glad Christmas is coming up, fingers crossed I get some money and I can invest in a second screen.
While modeling the columns its had made me aware how bad quality the images are that I have. I have done a google search searching for images larger than 8MB. This has helped ALOT, so much more detail in images. I actually wasnt aware that I could a search like this until my friend told me.
So the images that will be helping me with the columns are below:


Before coming across the more detailed image, I had started the shape, but now will need to delete the top part of this as there needs to be more edges.

To create this column I used a polygon cube, selected the bottom face and extruded out then moved downwards to create the shape. For the 4 front faces, I selected all of them, selected extrude and scaled them in and then extruded the centre in a little bit.


This is the bottom of the columns, I think I will ask Drew for some feedback in the next class, need to figure out the best way to get the curves on some of the layers. I would imagine adding vertexes and amending the current vertexes in order to get the desired shape but for now I am just going to get the basic blocked shape and then amend later if needed.
So, after finishing the top of the column, I took a render of the scene and guess what...when I pressed on the 'X' of the rendered image it decided to close Maya, and me thinking it was asking if I wanted to save the image i press 'do not save'...so yes, I now have to redo the top of the column!
I have spent about half an hour going through the different screens to line everything up and make sure they are the same size etc, I cant believe I have just closed the file :(

I have redone the top of the column but for some reason am not as happy with it as I was with the one I lost. This screen shot shows some amendments I made. For some reason even though I was selecting the whole object it was only scaling one half of the square, so I selected the appropriate vertex and amended those and used all four views to check they were in the right place. To size up things up I also moved the whole object to the centre of the grid and lining up the particular square at the bottom so I knew how wide to make the ones at the top.

The next challenge is the actual arch itself, the upper part of this column breaks into two arches - one to the right and one to the left. So, will be interesting doing that, I presume If I create two arches and then delete faces and join the arches together in the right places, hopefully that will work. Trial and error I guess.
For the arches the Youtube video I found is: http://www.youtube.com/watch?v=FmcTj1AwirY - It shows the basic archway.
Another issue I am going to face is rendering, when I downloaded Maya 2014 it only downloaded the program and not mental ray, so will either have to do all of my rendering in Uni or will have to keep searching for a way to get this to work. I am not too bothered at this stage as I don't need to start render tests for a few weeks, when I start applying textures and lights. While on about textures, with all of the references I have I might be able to recreate a lot of it in photoshop, but will worry more about that when the time comes.
Another thing I need to ask Drew (should probably make a list) is what is the best way to go about duplicates. With there being 100 windows, 50 port holes, 50 archways...that is a lot of duplicating going on.
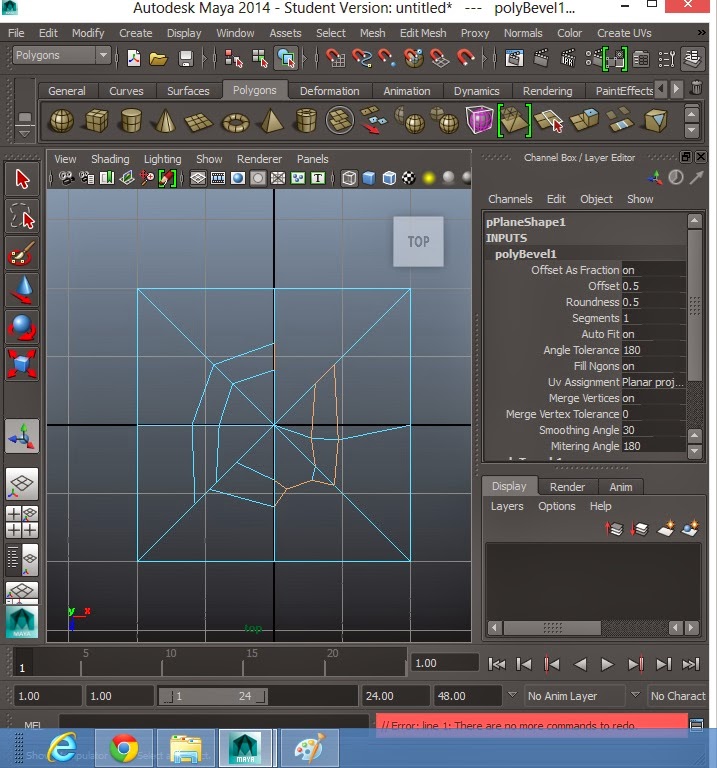
Back to the archway. Following the tutorial I combined the meshes to make them one, I then removed the top face and selected the bridge tool (as seen in first image below). I then changed the divisions to 9.


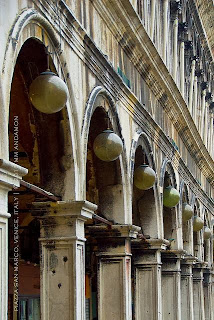
Now I need to upload another image into the image plane to get the right shape for the archway, and continue with adding the light I made in a separate file. Also, in a few other images there seems to be material hanging from some of the arches so will look more into that once I have finished the basic shape of the building.
At the minute when I move the archway it all goes messy, in the tutorial it says to keep it like this until you are finished editing. Once I am happy with the archway I can freeze transformation and then delete by type, history. I am going to leave it for now though because I still want to ask about the curves on the columns.
scratch that, I have to do the above steps as it wont let me extrude to make the shapes I need. In addition to the ref images above I am using these to help with this stage aswell:


Top of the arches:

Bottom of the arches:

Time to take a break as both my back and eyes hurt!
Things to ask:
- Best way of duplicating
- How to add the curves to certain parts of the column (redoing it using curves or keep as is)
Things to look into:
- Downloading Mental Ray
- double archway
- connecting archways
Friday, 29 November 2013
Modeling Progress


For the windows on the top of the building I came across a tutorial on youtube. The video showed a nice smooth way of creating these circle styled windows. I gave it a go and after 5 attempts I decided to move onto another section before I smashed the computer.
The technique was to use 4 of the faces and cut them into 8, then create a square in the centre of them and moving the vertexes to create a octagon, then create another octagon in side of that one....needless to say it did not want to work for me so I will be taking a little break from this section.
References
I have decided to make a blog entry purley for my website/book references so I have them in one place and can easily access them - These were accessed 29.11.13
To do list:
Test out curves for the top of the pillars on roof
Search high quality images for pillars on roof
Build bottom floor pillars and arches
Start looking at textures
To do list:
Test out curves for the top of the pillars on roof
Search high quality images for pillars on roof
Build bottom floor pillars and arches
Start looking at textures
- http://www.youtube.com/watch?v=qc5RSKsz-0g - Columns
- http://www.youtube.com/watch?v=8eYr0jTbAbE - Arches
- http://www.youtube.com/watch?v=FmcTj1AwirY - Arches
- http://www.digitaltutors.com/lesson/4089 - Details for building
- http://www.digitaltutors.com/lesson/12167-Dressing-the-window-areas - for top of windows (use blinds modeling)
- http://www.digitaltutors.com/lesson/4084 - stone ground - try just extruded each square on the ground a little bit..keep all faces together
Proposal
Title: The ‘Real’ David
Outline:
The project will be to model the statue of David and the environment around him in 3D, using Autodesk Maya. The objective of this is to create a realistic scene, show casing my modelling and texturing skills.
If there is time after I have completed the models and texturing, I will add a cartoon version of the statue of David. This piece starts with the realistic scene, David then opens his eyes and breathes out, releasing his cartoon version (a fat, very little muscle definition version) and stretches, he then goes back into his pose and turn back into the realistic version.
Motivation:
I would like to work with in the modelling department upon graduating therefore I have focused on this for my final year project.
I feel adding the realistic and cartoon style will help for future employment, it shows that I am not a one trick pony and can create more than one style. This will also give variety to my reel and portfolio.
Technical Description:
To complete this project I will need to look at images and also find out information on the statue of David and San Marco square (where the statue will be situated). This will help to understand the look, personalities and also get the feel across in the realistic aspects of design, colour and atmosphere.
Another area I will investigate is the textures. This includes the fact that the square is known for flooding so I will need to take this into consideration. I will also need to show the results of the statue being outside – water damage, sun damage, bird droppings etc. The way the textures are added will play a big part in the effect and the realism so is another aspect to look at.
A few years back I worked for an architect firm which started my love for buildings; I wanted to incorporate this into my project but needed something more substantial. With having family in Italy it brought the idea of recreating an Italian scene. I wanted it to be a well-known place so it was easier for people to recognise. By doing so it also helps me perfect my skills and pushes me to do my best.
I thought just a building would not be enough to showcase my skills or be powerful enough as a finally project, therefore I decided to add a statue to the middle of the square, again going for a well-known figure. The Statue of David came to mind first, as it has defined features and not only helps with my modelling skills but helps with the realism I want to portray in the final product.
Literature review:
Books:
Journals/Magazines:
Websites:
What are you producing:
I will be producing a report including screen shots and other visuals to show my progress throughout this project. I will also be producing the final product which will be a film (720p, mp4) including the 3D models, textured and the wire frames.
Schedule: 23 weeks (18 October – 21 March)
14 (Oct)
- Start finalising proposal
18 (Oct)
PROPOSAL DUE
21 (Oct)
- Start Research
- Sketching scenes
1 (NOV)
- Sketches Due
- Research completed
- Update report with completed work
4 (Nov)
- Start finalising artwork
15 (Nov)
- Artwork finalised
- Update Report with completed/finalised work 16 17
18 (Nov)
- Start modelling
- Start documents/visuals for review
28 (Nov)
- Animatic/ storyboard/ Visuals finalised for review
29 (Nov)
PROGRESS REVIEW
10 (Jan)
- Models Complete
- Environment Complete
31 (Jan)
- Textures finalised
7 (Feb)
- Render tests on textures complete
21 (Feb)
- Lighting Completed
28 (Feb)
- Test renders completed
21 (March)
Product Submission
Outline:
The project will be to model the statue of David and the environment around him in 3D, using Autodesk Maya. The objective of this is to create a realistic scene, show casing my modelling and texturing skills.
If there is time after I have completed the models and texturing, I will add a cartoon version of the statue of David. This piece starts with the realistic scene, David then opens his eyes and breathes out, releasing his cartoon version (a fat, very little muscle definition version) and stretches, he then goes back into his pose and turn back into the realistic version.
Motivation:
I would like to work with in the modelling department upon graduating therefore I have focused on this for my final year project.
I feel adding the realistic and cartoon style will help for future employment, it shows that I am not a one trick pony and can create more than one style. This will also give variety to my reel and portfolio.
Technical Description:
To complete this project I will need to look at images and also find out information on the statue of David and San Marco square (where the statue will be situated). This will help to understand the look, personalities and also get the feel across in the realistic aspects of design, colour and atmosphere.
Another area I will investigate is the textures. This includes the fact that the square is known for flooding so I will need to take this into consideration. I will also need to show the results of the statue being outside – water damage, sun damage, bird droppings etc. The way the textures are added will play a big part in the effect and the realism so is another aspect to look at.
A few years back I worked for an architect firm which started my love for buildings; I wanted to incorporate this into my project but needed something more substantial. With having family in Italy it brought the idea of recreating an Italian scene. I wanted it to be a well-known place so it was easier for people to recognise. By doing so it also helps me perfect my skills and pushes me to do my best.
I thought just a building would not be enough to showcase my skills or be powerful enough as a finally project, therefore I decided to add a statue to the middle of the square, again going for a well-known figure. The Statue of David came to mind first, as it has defined features and not only helps with my modelling skills but helps with the realism I want to portray in the final product.
Literature review:
Books:
- Pilling, S. and Biucchi, E. (2002) Venice an architectural guide. London: B T Batsford.
- Pardew, L. and Seegmiller, D. (2005) Mastering Digital 2D and 3D Art. Boston: Course Technology PTR
Journals/Magazines:
- Siggraph (2002) “SCA ’02 Proceedings of the 2002 ACM SIGGRAPH/Eurographics symposium of Computer Animation” available at: http://dl.acm.org/citation.cfm?id=545261.545281&coll=DL&dl=GUIDE&CFID=254562894&CFTOKEN=35504616 (Accessed October 17 20013)
- Stash Magazine (2013) Stash 101. Available at: http://www.stashmedia.tv/archive/ (Accessed October 17 2013)
Websites:
- ComPart Multimedia (2011) Italy Guides.it. Available at: http://www.italyguides.it/us/venice_italy/st_mark_s_square/piazza_san_marco/st_mark_s_square.htm
- PL Studios (2013) Digital Tutors. Available at: www.digitaltutors.com
- Harris, B., DR. and Zucker, S., DR. (2005) Khan Academy Smart History. Available at: http://smarthistory.khanacademy.org/Michelangelo-David.html
What are you producing:
I will be producing a report including screen shots and other visuals to show my progress throughout this project. I will also be producing the final product which will be a film (720p, mp4) including the 3D models, textured and the wire frames.
Schedule: 23 weeks (18 October – 21 March)
14 (Oct)
- Start finalising proposal
18 (Oct)
PROPOSAL DUE
21 (Oct)
- Start Research
- Sketching scenes
1 (NOV)
- Sketches Due
- Research completed
- Update report with completed work
4 (Nov)
- Start finalising artwork
15 (Nov)
- Artwork finalised
- Update Report with completed/finalised work 16 17
18 (Nov)
- Start modelling
- Start documents/visuals for review
28 (Nov)
- Animatic/ storyboard/ Visuals finalised for review
29 (Nov)
PROGRESS REVIEW
10 (Jan)
- Models Complete
- Environment Complete
31 (Jan)
- Textures finalised
7 (Feb)
- Render tests on textures complete
21 (Feb)
- Lighting Completed
28 (Feb)
- Test renders completed
21 (March)
Product Submission
Final Year Project
We have been given the brief for our final year project and its now time for idea making.
After having three years of experience on this course I have found I am interested in modeling environments. I do enjoy the concept art and character design stages as well but feel in the 3d world I am better suited to environments rather than character animation.
The reason being anything goes in an environment, I am aware a character can look however you want it to but with an environment there is more opportunities to explore with who, what, when, where, why!?.
Another area I would like to investigate into is matte painting/digital painting, this has come about after seeing other work by people on the course. There are so many different styles that I feel looks great and can see their work being illustrations for books or models for animations. I would love for my work to get the same feedback!
So, building on that, for my final year project I would like to make something that will challenge myself and be something that I haven't done before.
After doing some research and thinking I decided to go with modeling a well known place, this helps push me to get it right!
The first step is the proposal which I will post once that is completed.
Thursday, 28 November 2013
Progression Review
Title: The ‘Real’ David
I have created an original scene for my final year project, it consists of realistic and cartoon styles. The main scene is a realistic Procuratie Vecchie (in St Mark’s square) with the statue of David situated in the centre of the square. This is another creative addition as the statue of David is not normally in this area. As mentioned in the proposal, if there is time I will animate the statue, turning him from realistic to cartoon. He will also stretch in an exaggerated expression to clearly distinct the cartoon style. He will then go back to his stance turning back into the realistic form.
To help with this I have found further references in addition to those in my proposal:
(For some reason the blog wont let me upload some of the files so I have the actual pdf page of my progress review, and it has saved the images but not the text, obviously the computer is my friend today :/)


Schedule:
I have slightly amended my original schedule adding an extra week onto the modeling time frame. This is due to unforeseen circumstances. I had originally saved a few weeks extra at the end of my project therefore I feel my goal is still achievable with this amendment.
My plan is to create the building first and statues second. Once the models have been completed I will start with texturing and lighting so the render tests can be completed. Lastly I will be animating the camera to pan through the models to showcase my completed work and render as a quicktime video.
Updated schedule:
Tips to help with texture and design:
Maya progression:


Further references for Procuratie Vecchie :
Websites:
Books:
References for Statue:
Websites:
Books:
I have created an original scene for my final year project, it consists of realistic and cartoon styles. The main scene is a realistic Procuratie Vecchie (in St Mark’s square) with the statue of David situated in the centre of the square. This is another creative addition as the statue of David is not normally in this area. As mentioned in the proposal, if there is time I will animate the statue, turning him from realistic to cartoon. He will also stretch in an exaggerated expression to clearly distinct the cartoon style. He will then go back to his stance turning back into the realistic form.
To help with this I have found further references in addition to those in my proposal:
(For some reason the blog wont let me upload some of the files so I have the actual pdf page of my progress review, and it has saved the images but not the text, obviously the computer is my friend today :/)


Schedule:
I have slightly amended my original schedule adding an extra week onto the modeling time frame. This is due to unforeseen circumstances. I had originally saved a few weeks extra at the end of my project therefore I feel my goal is still achievable with this amendment.
My plan is to create the building first and statues second. Once the models have been completed I will start with texturing and lighting so the render tests can be completed. Lastly I will be animating the camera to pan through the models to showcase my completed work and render as a quicktime video.
Updated schedule:
Nov 28 – Jan 17 Modeling
Jan 18 – 31 Texturing
Feb 01 – 07 Rendering Tests
Feb 08 – 21 Lighting
Feb 22 – 28 Rendering Tests
March 01 - 07 Final Renders
March 08 – 21 In case anything runs over
Tips to help with texture and design:
- The ground of St Marks Square is natural stone that has been laid in a pattern designed by architect Andrea Tirali, this was so market merchants knew where to set up their stalls.
- Used to be apartments and offices with shops and restaurants on ground level.
- Built in 15th Century
- The square is overrun with pigeons and they have caused damage to buildings.
- The square floods
- David is 5.17 meters tall
- 50 arches along the wall
- Two stories of windows (50 each storey)
Maya progression:


Further references for Procuratie Vecchie :
Websites:
- Creating Tubes - Extruding along Curves in Maya (Pt. 1),video, CGCandy101, August 21 2012, viewed November 19 2013, <http://www.youtube.com/watch?v=u5jQqsiUlHQ>
- Autodesk Maya 2014 Tutorial | Introduction To Curves, video, Infinite Skills – Video Training, July 29 2013, viewed November 19 2013, <http://www.youtube.com/watch?v=EN04n09qvv8>
- Virtual Tourist (2013) Ala Napoleonica – Napoleonic Wing, Venic, Available at: http://www.virtualtourist.com/travel/Europe/Italy/Veneto/Venice-140867/Things_To_Do-Venice-Ala_Napoleonica_Napoleonic_Wing-BR-1.html (Accessed: November 22 2013)
- Karine Huguenaud (2008) ALA NAPOLEONICA IN PIAZZA SAN MARCO – VENICE, Available at: http://www.napoleon.org/en/magazine/museums/files/Ala_Napoleonica_in_Piazza1.asp (Accessed November 22 2013)
- A view on cities (2013) St. Mark’s Square, Available at: http://www.aviewoncities.com/venice/piazzasanmarco.htm (Accessed: November 27 2013)
- Venice Banana(2008) Procuratie Vecchie, Available at: http://www.venicebanana.com/loc-procuratie_vecchie_eng.html (Accessed: November 27 2013)
Books:
- Patner, P. 2009 (Third Edition). 3-D Human modeling and animation. New York: Wiley
References for Statue:
Websites:
- Vincent Finnan (2013) Michelangelo David The most famous statue in the world?, Available at: http://www.italian-renaissance-art.com/Michelangelo-David.html (Accessed: 19 November 2013)
- 3D Michelangelo's David, video, SeanEB, December 17 2006, viewed November 27 2013, <http://www.youtube.com/watch?v=e-l2BMStRcg>
- J. Huston McCulloch (2007) David: A New Perspective, Available at: http://www.econ.ohio-state.edu/jhm/arch/david/David.htm (Accessed: November 27 2013)
Books:
- Price, G. 2011. DK Eyewitness Top 10 Travel Guide: Venice. London: Dorling Kindersley
Wednesday, 13 November 2013
Procuratie Vecchie
Well as much as I enjoy researching longer than needed, I still cant seem to find out how many windows/arches are on the long side of Procuratie Vecchie (the building I am recreating.)
I have found an image which shows the back which has 2 floors, 15 arches on top floors.
I have found some better images as well which will help out with getting detail on the building as well so I feel like I can get a bit farther with this project in regards to starting to model.


I have found an image which shows the back which has 2 floors, 15 arches on top floors.
I have found some better images as well which will help out with getting detail on the building as well so I feel like I can get a bit farther with this project in regards to starting to model.


Subscribe to:
Posts (Atom)